@mycognosist
Welcome to my GitHub Page! I'm primarily working with Python (Flask) at the moment and learning a bit of Rust in my sparetime. I also like to work through CTF challenges when the mood strikes. I'm slowly building up a collection of blog posts, tutorials and walkthroughs - both to document my learning process and to share with others. Please feel free to reach out to me on Twitter or Scuttlebutt.
Micro Corruption: New Orleans
Introduction
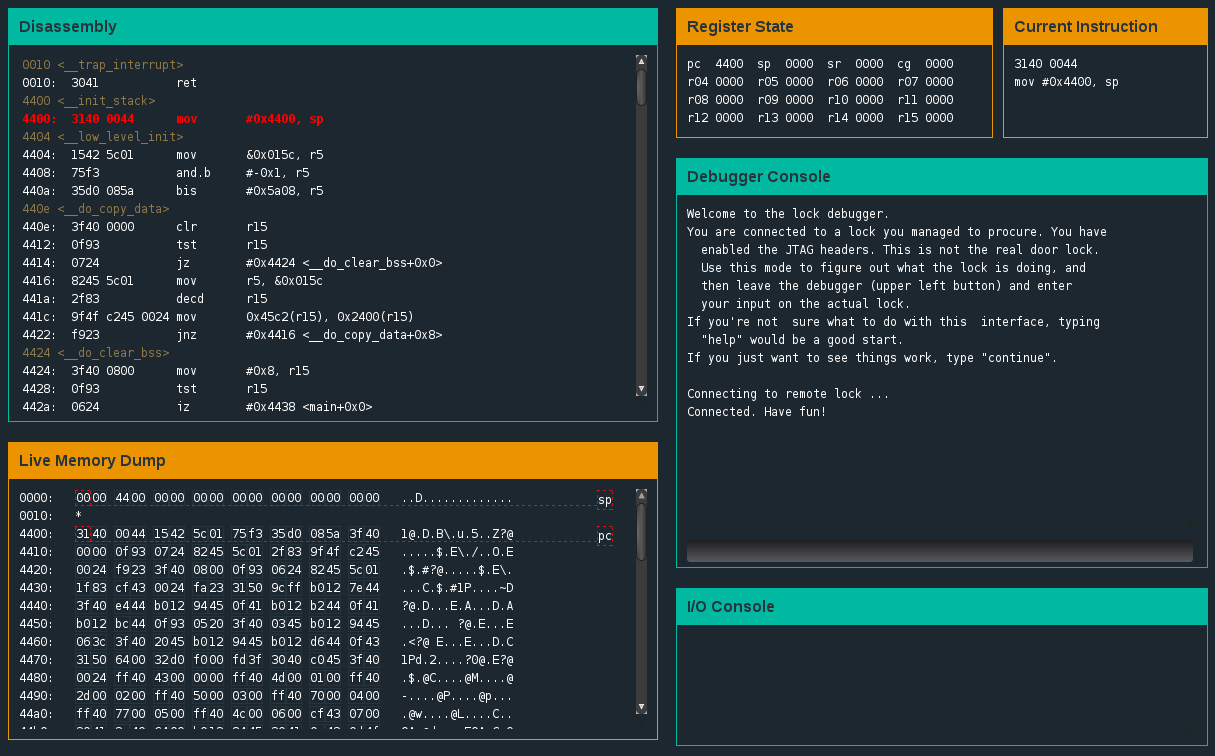
Micro Corruption is a Javascript-based CTF featuring story-based reverse-engineering challenges. The challenges run in the browser and feature a neat interface for reverse-engineering, including windows for: disassembly, live memory dump, register state, current instruction, debugger console and I/O console.
 Console
The challenge begins with a tutorial introducing you to the debugging platform and walks you through the exploitation of the first of a series of bluetooth locks. I suggest having an assembly instruction reference available if you’re new to reverse-engineering (for example: https://www.cs.virginia.edu/~evans/cs216/guides/x86.html. Having a solid knowledge of assembly instructions will help you understand program flow.
Once you’ve completed the tutorial, the first stage of the Micro Corruption CTF (New Orleans) becomes available.
The Challenge Begins
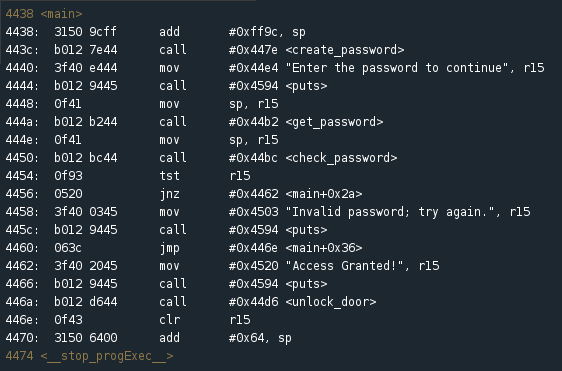
Before doing anything, scroll through the Disassembly window to take a look at the main function. The functions are clearly labelled and we see that at address 4450 a check_password function is called. That will be a good place to investigate further. Set a breakpoint by typing ‘break check_password’.
 Main function
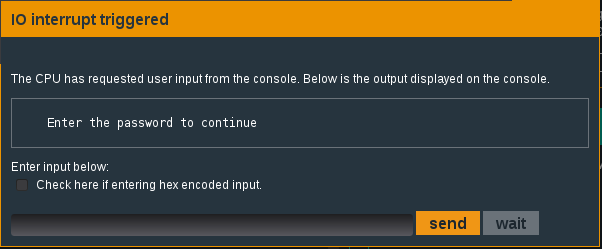
Now begin execution of the program by typing ‘c’. The program executes and an I/O dialogue box is triggered, asking us to enter our password. At this stage we will simply enter ‘password’ and continue.
 Input password
Enter ‘c’ at the Debugger Console until you arrive at the breakpoint we set previously. This takes us to the
 Function: check_password
I wrote out the check_password function by hand to better understand what’s going on.
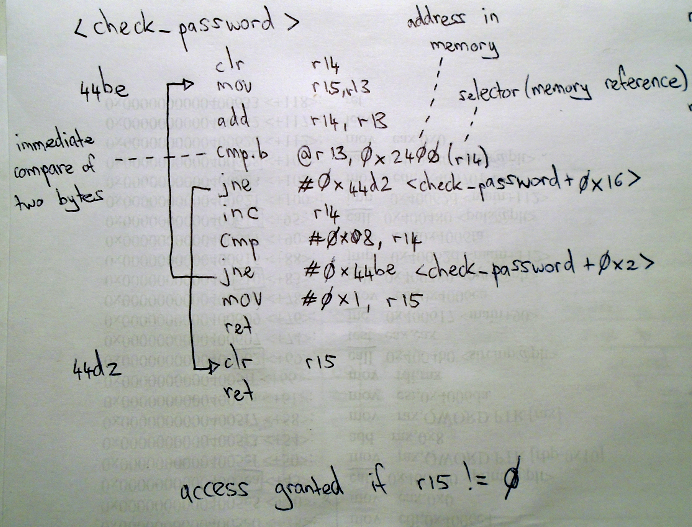
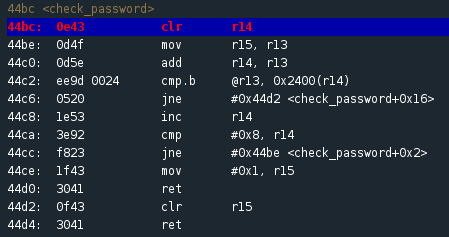
At first glance, we see that registers r14, r15 and r13 are active in this function. Great, now let’s try to understand the flow of the function. r14 is first cleared, setting its register state to 0000. Next, the value stored in r15 (439c) is moved into r13. The value of r14 is then added to r13. Since the value of r14 is currently 0, the value of r13 remains the same. This brings us to the first really interesting instruction. We see that the value of r13 is compared with an address in memory: 0x2400(r14). If the values do not match, we jump to 44d2 which sets r15 to 0 and returns to the main function. OK, interesting. Let’s quickly take a second look at the main function to see what happens when r15 returns with a value of 0.
Main function
In the main function we see that the check_password function is followed by the instruction: tst r15 (at address 4454), which checks the value of r15. If the value is zero we step to the next instruction which sets the value of r15 to “Invalid password; try again”. However, if the test returns 1 we perform the jump to 4462: “Access Granted!”. Great. Now we know that the check_password function must return an r15 value greater than 0 to be successful. With that in mind, let’s go back to the check_password function to gain a better understanding of the control flow.
Function: check_password
So we know that two values are compared at 44c2: the hex value of the first character of the password we entered is being compared with the value for the corresponding character of the actual password. If correct, r14 is increased by 1 and its value is then compared with #0x8. If not equal to 0x8, we jump back to the beginning of the check_password function (44be) and compare the next character in the password. If the comparison at 44ca is equal to 8, the value of r15 is set to 1 and the program then returns to the main function. As we know from our analysis of the main function, a return value of 1 for r15 represents successful access (in other words, a correct password). We can infer from this that the correct password is going to have a length of 7 characters (0x08 = 7 characters + a null byte).
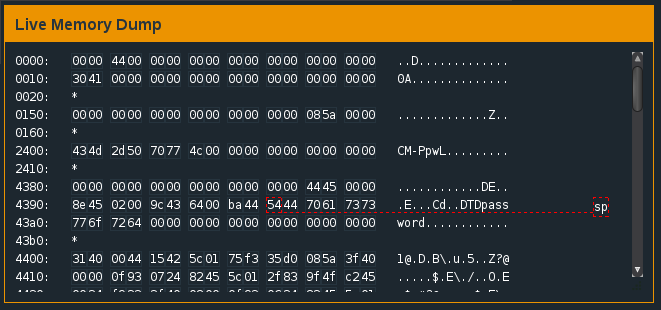
Let’s check the memory address holding the correct password comparison value: 0x2400(r14).
 Memory dump
Since the value of r14 is 0000 (remember, the value is cleared at the beginning of the check_password function), we want to consider the first byte stored at 2400: 43. You might find it handy to have a hex → asci / asci → hex converter ready in the browser (I used http://www.rapidtables.com/convert/number/hex-to-ascii.html). The hex value 43 represents C in asci. Awesome, we’re making progress. So this means that the first character of the password we entered is compared with the character C. If they’re equal, the function jumps back to the second instruction (mov r15, r13 at 44be) and flows forward to compare the second character of our password. I verified this by resetting the program (‘reset’ at the debugger console), setting the breakpoint (‘break check_password’), running the program (‘c’), entering a 7 character password starting with a capital C (‘Cassword’), continuing to the check_password function and then seeing what happened at 44cc when the value of the comparison was acted upon. What happened? The program jumped up to 44be and proceeded to compare the second character of the password.
Knowing that the correct password is stored in memory, we look again at the Live Memory Dump window and notice that a string is listed at the 2400 address: CM-PpwL. The fact that it’s 7 characters long is a good sign – this just might be the correct password!
Enter ‘solve’ at the Debugger Console and enter CM-PpwL as the password.
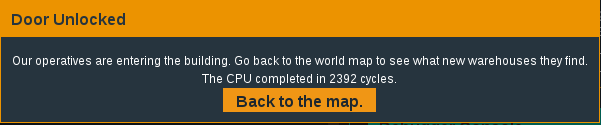 Success!
We did it! Rad! Go back to the map / main screen and you’ll see that the next challenge has been unlocked: Sydney.
Conclusion
I hope this walk-through benefited you in some way. I’m brand new to reverse-engineering, having only watched a few videos and read a couple articles, and tried to sketch my thought-process as I moved through the challenge. If you’re also new to RE, remember to focus on understanding the flow of the program and the major functions. This will make the successful exploitation of your target much smoother. Perseverance, dedication and meditation are your friends!
I’ll be doing write-ups for each stage of the Micro Corruption CTF and will post them as I progress. Thanks for reading!