@mycognosist
Welcome to my GitHub Page! I'm primarily working with Python (Flask) at the moment and learning a bit of Rust in my sparetime. I also like to work through CTF challenges when the mood strikes. I'm slowly building up a collection of blog posts, tutorials and walkthroughs - both to document my learning process and to share with others. Please feel free to reach out to me on Twitter or Scuttlebutt.
Micro Corruption: Sydney
Introduction
Having successfully passed the first challenge, we move on to tackle the lock based in Sydney. Upon accessing the Syndey challenge we’re first greeted with a User Manual for the Lockitall LockIT Pro, rev a.02. The last paragraph mentions the vulnerability in the previous challenge (ie. the reason for the revision):

The Challenge Begins
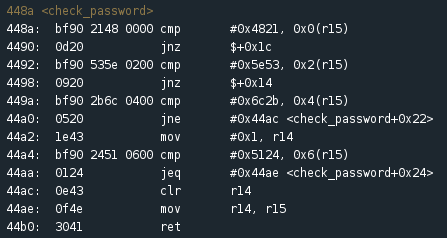
At first glance, the disassembly of the program looks very similar to the previous challenge. The main function calls the check_password function, after which the value of r15 is tested. If the result of the test is not equal to zero we jump to address 445e which ultimately results in “Access Granted!”. So now we can look for the conditions under which r15 will not be equal to zero when the check_password function returns. Let’s scroll down in the Disassembly window and take a look at the check_password function.
 Function: check_password
The first instruction (cmp) compares the hex value 0x4821 with the first two bytes of the value stored in r15. If the values are the same, the next instruction passes the instruction pointer down to a second compare instruction. This time, the hex value 0x5e53 is compared with the third and fourth bytes stored in r15. Following this pattern, we notice a further two compare instructions with test values of 0x6c2b and 0x5124 respectively. We can enter these values into a hex to ascii converter to get a better idea of what’s being compared. This is what we get: 4821 H!; 5e53 ^S; 6c2b l+; 5124 Q$. Could these characters make up our password?
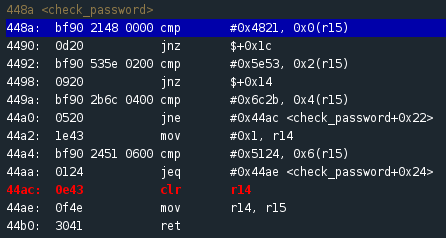
Let’s set a breakpoint at the beginning of the check_password function so we can attempt to validate our hunch: enter ‘break check_password’ at the console and then type ‘c’ to kick things off. When prompted for a password we can enter ‘H!ssword’ to see if we’re on the write track. Continue to the breakpoint and then step (‘s’) down to see what happens when we hit the jump at address 4490.
 Unsuccessful jump takes us to 44ac
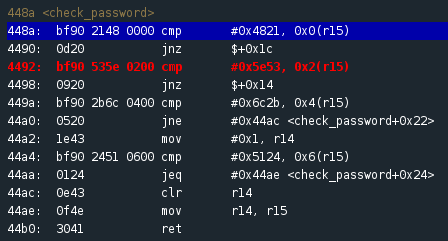
Hmm…that didn’t work. After the first compare we met the jump not equal instruction and jumped to address 44ac, ultimately ending up back in the main and failing to gain access. If the first two characters aren’t ‘H!’ then maybe they are being read backwards. Reset the program, enter ‘!Hssword’ as the password and try again. This time when we reach the jump not zero condition at 4490 we step down to the second compare instruction at 4492. Success! If you wish to understand why the bits were read in the opposite direction you can read-up about Endianness.
 Program counter at 4492 after successful compare
If we continue stepping through the program we see that the second compare at address 449a fails, as we should have expected. Now we can be fairly sure that our previously converted hex values from the compare instructions make up the password. We can reset the program at the console and rerun, this time entering ‘!HS^+l$Q’ as the password. Once the breakpoint is reached at the beginning of the check_password funtion, we step through all the compares and are returned to the main function. The value of r15 is tested and the jump (jnz) takes us to address 445e: “Access Granted!”. Sweet! Now we type ‘solve’ at the I/O Console and tada! We just completed the second challenge!
 Gotcha!
Conclusion
I hope you enjoyed that as much as I did! It was quite a simple solution in the end but the challenge taught some valuable lessons about hex and ascii, as well as reading compare instructions and practising control flow analysis. Keep your momentum going and tackle the Hanoi or Reykjavik challenge! I’ll be back soon with more write-ups. Thanks for reading and happy reverse-engineering!