@mycognosist
Welcome to my GitHub Page! I'm primarily working with Python (Flask) at the moment and learning a bit of Rust in my sparetime. I also like to work through CTF challenges when the mood strikes. I'm slowly building up a collection of blog posts, tutorials and walkthroughs - both to document my learning process and to share with others. Please feel free to reach out to me on Twitter or Scuttlebutt.
Writing a Python module with Rust
11 September, 2017
@mycognosist
Introduction
A few words about Rust
Rust is a systems programming language that runs blazingly fast, prevents segfaults, and guarantees thread safety. The project was established with the aim of creating a safe, concurrent, practical systems language while providing efficient code and a comfortable level of abstraction (FAQ). The 1.0 release of Rust was launched on 15 May, 2015, making it a young language that is still rapidly developing. With an engaged and helpful community, terrific documentation and elegant package registry (crates.io), Rust is a pleasure to learn and work with.
Why did I write this tutorial?
I’ve been learning and coding in Python for the past 10 months, primarily working on backend systems and RESTful APIs. After watching Samuel Cormier-Iijima’s excellent talk from PyCon Canada 2016, Extending Python with Rust, I felt inspired to begin learning (thanks Sam!). Writing Python libraries in Rust seemed like an easy-win and a useful technique for future projects. Thanks to the well-written Rust Book and helpful community members on the #rust-beginner irc channel, I had my first library working in two days. Buoyed by my early success, I decided to put together this simple tutorial in the hopes of helping others and reinforcing my understanding.
Why write Python libraries in Rust?
While Python is undoubtedly the Swiss-army knife of programming languages, there are situations in which a faster, lower-level and more lightweight toolset is required. For example, computationally-intensive and time-critical applications in industrial communications systems using embedded hardware. In such cases, an optimal solution can be crafted by building the backbone of the system in Python and relying on Rust extensions where greater low-level control and performance are required. I recommend reading Rust for Python Programmers by Armin Ronacher if you’re looking for greater detail on this subject.
Getting started
1. Install Rust
If you’re running a *nix distribution, run the following command in your terminal:
curl https://sh.rustup.rs -sSfIf you’re running Windows, download and run the following executable:
Further information can be found on the official Rust installation page.
- The rest of the instructions will be for *nix users.
2. Create a working directory
Navigate to your preferred directory and create a new Rust project. I have a projects directory on my home partition, with a rust directory inside of that. Running the following command will create a directory according to the project name you specify and populate it with a number of files:
cd /home/projects/rust
cargo new python_lib_tut
3. Set configuration in Cargo.toml
Move into the newly created directory and open the Cargo.toml file with your preferred text editor:
cd python_lib_tut
vim Cargo.toml
You’ll see the package information at the top of the file, including name, version and authors (that’s you). Correct the authors information if required. This information is important since it’ll be included with your package if you choose to publish it to crates.io. You will also notice an empty dependencies section.
Next, we’re going to define the name and crate-type of our library. The name will be used to import the library in Python. Add the following after the package section:
[lib]
name = "status"
crate-type = ["cdylib"]
Then we need to define the project dependencies. We’re going to be using the cpython bindings to integrate our Rust code with Python.
[dependencies]
cpython = "*"
The above dependency declaration pulls the latest stable release of cpython. For the very latest release, declare as follows:
cpython = { git = "https://github.com/dgrunwald/rust-cpython" }Here is the complete Cargo.toml code for our project:
[package]
name = "python_lib_tut"
version = "0.1.0"
authors = ["mycognosist <gnomad@cryptolab.net>"]

[lib]
name = "status"
crate-type = ["cdylib"]

[dependencies]
cpython = "*"
Save the updated configuration and exit.
4. Open src/lib.rs and begin editing
Next, we’re going to open src/lib.rs and begin editing; this is where the actual code of our library lives. When you first open the file you’ll see the following code:
#[cfg(test)]
mod tests {
    #[test]
    fn it_works() {
    }
}
Let’s delete that code so we have a blank file and then enter the following:
#[macro_use]
extern crate cpython;

use cpython::{PyResult, Python};
In the above code segment, the first line has to do with macros - a metaprogramming facility in Rust - and communicates to the compiler that we wish to use all the macros defined in the crate(s) listed below. I encourage you to investigate further in the Macros section of the first edition of the Rust Book.
The second line of code is a declaration linking the cpython crate to our new library. The contents of the crate are downloaded at compile-time and incorporated into our library. Further details here.
The final line of the above code segment defines the types we’re drawing from cpython.
Next, we’re going to write our function. For this example, the function will receive a string and then return a string based on a simple pattern-match:
fn colour(_py: Python, val: String) -> PyResult<String> {
    match &*val {
        "online" => Ok("green".to_string()),
        _ => Ok("red".to_string()),
    }
}
The function has two parameters, the first is a Python object (allowing us to interface with the Python interpreter) and the second is a String that will be passed into our Rust code from Python. PyResult is an object that allows us to return exceptions to Python. This line of code is known as a signature in Rust. We then use match, a nifty feature of Rust, to run a check on the string (val) that has been passed into the function. If val is “online”, we return “green”, for all other cases (note the underscore) we return “red”. The code within Ok() defines the return value of our function, and to_string() is a trait used to convert a given value to a String. That’s all there is to the function!
After writing our function code we need to integrate Rust with the Python interpreter:
py_module_initializer!(status, initstatus, Pyinit_status, |py, m| {
    m.add(py, "__doc__", "This module is implemented in Rust.")?;
    m.add(py, "colour", py_fn!(py, colour(val: String)))?;
    Ok(())
});
py_module_initializer is a macro defined by the cpython crate we imported at the top of our library. The first parameter (‘status’) is the name of our module, the second parameter is the Python2 naming for our module, while the third parameter is for Python3. The last segment of code on the first line (py, m) allows the modification of received module objects.
We then add a docstring and use the py_fn! macro to build the Python version of our function. That’s all there is to it! Save and exit.
Here’s the complete code for our module:
#[macro_use]
extern crate cpython;

use cpython::{PyResult, Python};

fn colour(_py: Python, val: String) -> PyResult<String> {
    match &*val {
        "online" => Ok("green".to_string()),
        _ => Ok("red".to_string()),
    }
}

py_module_initializer!(status, initstatus, PyInit_status, |py, m| {
    m.add(py, "__doc__", "This module is implemented in Rust.")?;
    m.add(py, "colour", py_fn!(py, colour(val: String)))?;
    Ok(())
});
6. Compile the code
You should be in the root directory of your Rust module (in my case: /home/projects/rust/python_lib_tut). Run the following command to compile the code:
cargo build --release Note: The default behaviour of cpython is to use whichever Python3.x interpreter is set in PATH at compile time.
7. Copy the library
If everything went smoothly, you should see a new directory named ‘target’ in the project root. The library itself can be found in target/release and is named ‘libstatus.so’. Let’s copy the library and then fire up the Python interpreter to test our function:
cp target/release/libstatus.so status.so
python
8. Open Python interpreter and test
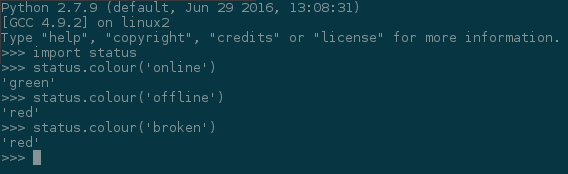 Our brand new module in action
That’s all there is to it!
Additional information
I recommend looking through the rust-cpython repo for additional docs and info. It took me a while to figure out how to compile the library for Python2.7. Here’s how:
Open the Cargo.toml file in the root of your Rust module and edit the dependencies section as follows:
[dependencies]
cpython = { version = "0.1", default-features = false, features = ["python27-sys", "extension-module-2-7"] }
Conclusion
I really hope you found this tutorial helpful in some way! If you notice any errors or inaccuracies, please drop me a message via Twitter or email (gnomad@cryptolab.net). I’m already looking forward to my next Rust project!